Create and Manage CDC Pipelines🔗
A pipeline in Matillion CDC is a collection of configuration details, including the source configuration, target configuration, and any advanced properties that allow the CDC agent to begin monitoring, consuming database changes, and delivering them to the appropriate data lake.
The specific details of creating a CDC pipeline depend on the data source being used, but the general process of creating and editing the pipeline is the same in each case, and is described in this article.
Note
You can only add a pipeline when the status of your chosen CDC agent is "connected". For more information, read status details.
Prerequisites🔗
Ensure you meet the following requirements before creating a pipeline:
- An active account on the data source, with sufficient permissions to access it and configure it for CDC.
- A connected CDC agent.
- A running instance of the data source.
- Connection details such as host name, database name, and login details to connect CDC to the data source.
Create pipeline🔗
Creating a CDC agent is only the first step in the process. The pipeline is how Data Loader extracts the information the CDC agent provides, and then loads it into a specified destination. Without a defined pipeline the CDC agent won't carry out any tasks.
There's currently no limit to the number of CDC agents and pipelines you can create in your account. However, you can only use a connected CDC agent as part of a pipeline ONCE. If you want to use the same CDC agent for subsequent running pipelines, you will have to recreate it or delete the original pipeline the CDC agent is assigned to.
Progress through the wizard to create your pipeline. Each of the headings in this section represents the steps in the wizard you are required to complete.
- In Data Loader, click Add pipeline.
- Under Load data type in the sidebar, click CDC.
- Choose your data source from the grid of supported sources.
- Click Change Data Capture.
Choose a CDC agent🔗
Before you connect to a data source, which is described in the next section, you are required to choose an agent to manage your pipeline. If one doesn't exist, you will need to create one. To do this you must make sure you can access your chosen cloud platform, and you are familiar with its services. There are two ways to create a CDC agent: manual or templated installation. We recommend you choose the templated installation. Many types of templates can help you to configure some of the resources you need for creating a CDC agent. For more information, read CDC agent installation.
Note
When you're creating a CDC agent, or using an existing one to create a pipeline, make sure the CDC agent resources are in the same region as your chosen cloud provider account. For more information, read AWS regions and zones, Azure regions for virtual machines, and GCP regions and zones, respectively.
Click Add pipeline next to your chosen CDC agent to open the pipeline creation wizard. Progress through the wizard to configure your CDC pipeline:
Connect to the source🔗
The first step of the wizard requires you to connect to a chosen data source. Before connecting to one, you must select a CDC agent before configuring the connection to the data source. The exact details required for the connection will depend on the data source, but typically you will need the following connection details:
- Server address (the URL, domain name, or host name of the server hosting your source database).
- Port (the port used to communicate with the source database).
- Username, and your chosen cloud platform account's secret name that you have defined on the source database.
- Some sources may require additional details such as a database name or REST endpoint.
Optionally, if supported by the data source, you may specify additional JDBC connection parameters. Click Advanced settings and then choose a parameter from the drop-down and enter a value for the parameter. Click Add parameter for each extra parameter you want to add. The documentation for your source data model will provide information about supported JDBC connection settings.
Once you have entered all connection settings, click Test and continue.
Choose schema🔗
Select a schema you wish to load from. Use the arrow buttons to move schemas to the Selected schemas listbox, and then reorder any schema with click-and-drag. You can select multiple schemas using the SHIFT key. Click Continue with X schema to move forward.
In the next step, select the tables in your chosen schemas.
Choose tables🔗
Choose the tables you wish to include in the pipeline. Use the arrow buttons to move tables and schemas to the Tables to extract and load listbox, and then reorder any tables with click-and-drag. You can select multiple tables using the SHIFT key.
Note
Select any schemas and tables that you wish to include in the pipeline, and all columns in the intended tables will be selected.
Table column names will be sanitized to adhere to the following rules:
- Start with
A-Zora-zor_. - Subsequently contains only
A-Zand/ora-zand/or0-9and or_characters (no spaces). - Example:
| Incorrect | Correct |
|---|---|
I have a space |
I_have_a_space |
123_i_start_with_an_int |
_123_i_start_with_an_int |
This process can result in duplicate field names, preventing the pipeline from running. For example, the following field names are different but will become identical after sanitization: duplicate$. becomes duplicate__, and duplicate.$ becomes duplicate__.
To overcome this, the column.exclude.list advanced setting can be used to exclude any columns that might clash with other sanitized fields.
Note
You must ensure that the selected tables are enabled for CDC in the source. The requirement for this will depend on the data source being used, and is described in the documentation for each source.
Click Continue with X tables to progress.
Choose destination🔗
Once you configure the source, you must connect to a destination to load your data into.
- Choose an existing destination or click Add a new destination.
- Select a destination from the available options and specify the connection settings, as described in the following articles:
Pipeline settings🔗
- Give your pipeline a unique name, so you can use it later.
- Disable/enable the snapshotting phase for your chosen source.
To learn more about snapshotting options, read the "Advanced Settings" section of the documentation for your CDC source:
Click Create Pipeline.
Note
Customers are charged for the first full load snapshot for the dataset you select. For example, if you build up a pipeline and enable a snapshot on a table with 1000 rows, you will be charged for 1000 rows. However, if the pipeline stops for any reason and the CDC agent drifts out of sync, or you need to reset and recreate the pipeline, another snapshot will need to be taken. You will NOT be charged if the original PipelineID and AgentID haven't changed.
Pipeline summary🔗
This page is displayed at the final stage of the pipeline creation process, and is available in read-only mode. The pipeline summary page lets you review the selections you have made in each of the previous stages. For more information, refer to the article on the CDC Pipeline UI. You can return to any earlier stage to make adjustments if required.
The summary is divided into the following sections:
- Agent Details
- Source Details
- Selected Tables
- Destination Details
- Pipeline Settings
When you're satisfied with your selections, click Update pipeline to complete the process.
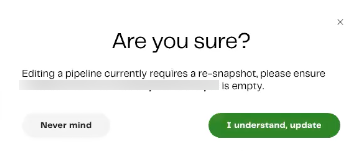
A dialog will appear for the confirmation. If you're satisfied with the changes and have made sure the intended cloud storage is empty, click I understand, update.
Manage pipeline🔗
After the creation of your pipeline, you can manage it through the pipelines dashboard. The dashboard lists a summary of each existing pipeline, including its Name, Source, Destination, Status, and Last sync.
The pipeline's Status will be one of the following:
- Unavailable: The pipeline's CDC agent isn't currently connected. This may indicate a fault in the CDC agent's installation.
- Not running: The pipeline's CDC agent is connected but is stopped and not running currently.
- Snapshotting: The pipeline is performing a snapshot to get the initial database state required for CDC to start.
- Streaming: The pipeline is streaming change records to cloud storage.
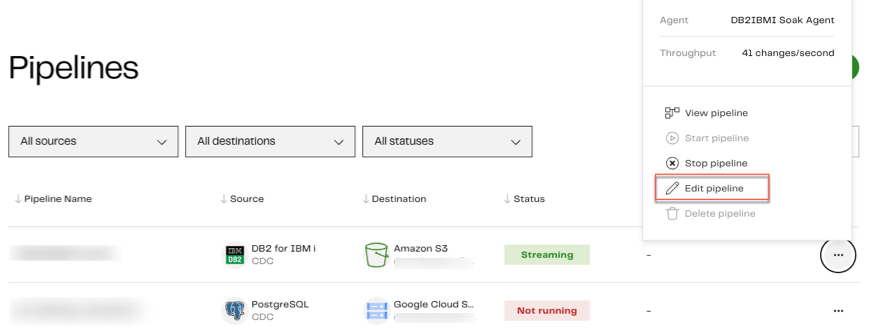
You can click the three dots ... next to any pipeline to open a dialog displaying the following:
- CDC agent name.
- Pipeline's throughput.
- View pipeline.
- Start/stop pipeline. If the pipeline is in a streaming state, you can click Start to restart it.
- Edit pipeline
- Delete pipeline.
Enabling Email Alerts🔗
You can enable email alerts to let you know when your pipeline stops due to a failure. See Events for more information.
Edit pipeline🔗
Data Loader lets you modify existing pipelines to meet your requirements, rather than having to delete them and start over. The pipeline creation wizard will reopen, allowing you to make changes to certain elements of your pipeline. Not all elements can be modified. In these circumstances, you will have to delete and recreate the pipeline if you want to choose a different CDC agent and source.
Note
- If you're using the same prefix, you must clear your prefix folder of all files within your chosen cloud storage location.
- Editing a pipeline currently requires a re-snapshot (if in use). You must make sure your intended cloud storage location is empty.
- When deleting and recreating a CDC pipeline, you must clear out the files that the pipeline places in your cloud storage. If you don't, the new pipeline will recognize the existing
offset.datfile and will therefore skip the snapshot phase.
To edit an existing CDC pipeline, do the following:
-
From either the pipeline dashboard, or a given pipeline's details page, click the three dots ... to the right of the intended pipeline, and select Edit Pipeline.
-
To confirm your intended cloud storage location is empty, and that you understand a re-snapshot is required to edit a pipeline, click I understand.

-
Modify the following elements of your existing pipeline:
- Connect to source: While you can modify the source details of your existing database and retest the connection, you can't change the type of database source. For example, switching from a PostgreSQL database to a MySQL database. Once you have made modifications to your connection settings, click Test and continue. For more information about this stage of the wizard, read Connect to the source.
- Choose Schemas: Modify the schemas you want your data to load from. In the next step of the wizard, you can modify the tables in your chosen schemas. Click Continue. For more information about this stage of the wizard, read Choose with X schemas.
- Choose Tables/Configure columns: Select a schema to choose your tables. You can select tables from multiple schemas if you wish. Click Continue with X tables, then edit the columns of your chosen tables. Click Continue to progress through the wizard. For more information about this stage of the wizard, read Choose tables.
- Configure Destination: Modify the connection details of your chosen destination, and click Continue. For more information about this stage of the wizard, read Choose destination.
- Pipeline settings: Edit your pipeline name, and use the Snapshotting radio button to disable/enable the Snapshot database for the source, then click Continue. For more information about this stage of the wizard, read Pipeline settings.
- Pipeline Summary: In read-only mode, review the details of your pipeline. Click Update Pipeline. For more information about this stage of the wizard, read Pipeline summary.
Now your pipeline has been updated with new details, you will return to the pipelines dashboard, where a notification will display "Saved pipeline [PipelineName] has been updated", and a list of pipelines, including the one you have just modified will be displayed. You can add another pipeline if you wish, by clicking Add pipeline.
Disable and clear the shared job🔗
If your pipeline has a shared job currently in use in Matillion ETL, its schedule must be disabled. Read Manage Schedules for details about how to do this.
Additionally, if the Change Log Transformation shared job is in use, you may want to clear data to avoid duplication. To do this, run the Drop CDC Tables shared job with the property Actually Drop The Tables set to Y. This will drop the CDC tables currently in the target database.
We advise that you run the Drop CDC Tables shared job with Actually Drop The Tables set to N first, then check the task history to see which tables would be dropped. If you are happy that this is correct, you can run the job again with the property set to Y to actually drop the tables.
You don't need to clear down the tables when using the Copy Table transformation, as it merges new events into the target table using the primary key and therefore tries to update all the existing records.