Designer snippets
If the component requires access to a cloud provider (AWS, Azure, or GCP), it will use credentials as follows:
- If using Matillion Full SaaS: The component will use the cloud credentials associated with your environment to access resources.
- If using Hybrid SaaS: By default the component will inherit the Maia agent's execution role (service account role). However, if there are cloud credentials associated to your environment, these will overwrite the role.
If the component requires access to a cloud provider (AWS, Azure, or GCP), it will use the cloud credentials associated with your environment to access resources.
Use the reference tables below to set up your environment connection to your cloud data platform. If you're using a Full SaaS deployment, credentials such as passwords and private keys are stored directly as strings. However, if you're using a Hybrid SaaS deployment with your own AWS or Azure Maia agent, credentials such as passwords and private keys are only retrieved via references to secrets created in either AWS Secrets Manager or Azure Key Vault.
Refer to this table if you're using your Snowflake password to authenticate to Snowflake.
| Parameter | Description |
|---|---|
| Account | Enter your Snowflake account name and region. In the URL you use to log in to Snowflake, this is the part between https and snowflakecomputing.com. |
| Credentials type | Select Username and password. |
| Username | Your Snowflake username. |
| Password | Your Snowflake password. This field is only available if using a Full SaaS deployment; otherwise, you will specify your password as a secret. |
| Vault name | For Hybrid SaaS on Azure deployment models only. Select the Azure Key Vault instance that this project will use to store secrets. Select [Default] to use the default key vault specified in the Maia agent environment variables. |
| Secret name | A named entry created in AWS Secrets Manager or Azure Key Vault for holding your Snowflake password. Field only available if using a Hybrid SaaS deployment model. |
| Secret key | A named secret key tied to your secret name. Field only available if using a Hybrid SaaS on AWS deployment model. |
Refer to this table if you're using Snowflake key-pair authentication.
| Parameter | Description |
|---|---|
| Account | Enter your Snowflake account name and region. In the URL you use to log in to Snowflake, this is the part between https and snowflakecomputing.com. |
| Credentials type | Select Key pair. |
| Username | Your Snowflake username. |
| Private key | Your Snowflake private key. To generate a key, read the Snowflake documentation for Generate the private key. The full content of the generated Snowflake private key file must be copied into this field, including the header and footer lines. Field only available if Credentials type is Key pair when using a Full SaaS deployment model. |
| Passphrase | An optional passphrase to use with your private key. Field only available if Credentials type is Key pair and when using a Full SaaS deployment model. |
| Vault name | For Hybrid SaaS on Azure deployment models only. Select the Azure Key Vault instance that this project will use to store secrets. Select [Default] to use the default key vault specified in the Maia agent environment variables. |
| Private key secret name | A named entry created in AWS Secrets Manager or Azure Key Vault denoting the secret that holds your Snowflake private key. Read Using snowflake key-pair authentication to learn how to store the key as a secret. Field only available if using a Hybrid SaaS deployment model. |
| Passphrase secret name (optional) | A named entry created in AWS Secrets Manager or Azure Key Vault denoting the secret that holds your Snowflake key pair passphrase. Field only available if using a Hybrid SaaS deployment model. |
| Passphrase secret key (optional) | The secret key tied to your passphrase secret name. Field only available if using a Hybrid SaaS deployment model. |
| Parameter | Description |
|---|---|
| Instance name | Your Databricks instance name. Read the Databricks documentation to learn how to determine your instance name. |
| Personal Access Token | Your Databricks personal access token. Read the Databricks documentation to learn how to create a personal access token. |
| Vault name | For Hybrid SaaS on Azure deployment models only. Select the Azure Key Vault instance that this project will use to store secrets. Select [Default] to use the default key vault specified in the Maia agent environment variables. |
| Secret name | A named entry created in AWS Secrets Manager or Azure Key Vault. |
| Secret key | For Hybrid SaaS on AWS deployment model only. A named secret key tied to your secret name. |
| Parameter | Description |
|---|---|
| Endpoint | The physical address of the leader node. This will be either a name or an IP address. |
| Port | This is usually 5439 or 5432, but it can be configured differently when setting up your Amazon Redshift cluster. |
| Use SSL | Select this to encrypt communications between Maia and Amazon Redshift. Some Amazon Redshift clusters may be configured to require this. |
| Username | The username for the environment connection. |
| Password | For Full SaaS deployment model only. Your Redshift password. |
| Vault name | For Hybrid SaaS on Azure deployment models only. Select the Azure Key Vault instance that this project will use to store secrets. Select [Default] to use the default key vault specified in the Maia agent environment variables. |
| Secret name | For Hybrid SaaS deployment model only. A named entry created in AWS Secrets Manager or Azure Key Vault. |
| Secret key | For Hybrid SaaS on AWS deployment model only. A named secret key tied to your secret name. |
| Parameter | Description |
|---|---|
| Default role | The default Snowflake role for this environment connection. Read Overview of Access Control to learn more. |
| Default warehouse | The default Snowflake warehouse for this environment connection. Read Overview of Warehouses to learn more. |
| Default database | The default Snowflake database for this environment connection. Read Database, Schema, and Share DDL to learn more. |
| Default schema | The default Snowflake schema for this environment connection. Read Database, Schema, and Share DDL to learn more. |
| Default session parameters | Any session parameters you want to set as the default for this environment connection. Click the cog icon to open the Configure Session Parameters dialog, and enter a name and value for each required parameter. See below for more details. |
| Allow inherit project defaults | Use this toggle to manage how the environment handles variable values. When enabled (default), the environment inherits project-level default values. If disabled, you must manually provide values for each variable to ensure pipelines function successfully across environments. |
| Parameter | Description |
|---|---|
| Endpoint/Cluster | The Databricks cluster that Maia will connect to. |
| Catalog | Choose a Databricks Unity Catalog to connect to. |
| Schema | Choose a Databricks schema to connect to. |
| Allow inherit project defaults | Use this toggle to manage how the environment handles variable values. When enabled (default), the environment inherits project-level default values. If disabled, you must manually provide values for each variable to ensure pipelines function successfully across environments. |
| Parameter | Description |
|---|---|
| Default database | The database you created when setting up your Amazon Redshift cluster. You may run with multiple database names—in which case, choose the one you want to use for this environment. |
| Default schema | This is public by default, but if you have configured multiple schemas within your Amazon Redshift database, you should specify the schema you want to use. |
| Default S3 bucket | The S3 bucket that this environment will use for staging data by default, unless specifically overridden within a component. |
| Allow inherit project defaults | Use this toggle to manage how the environment handles variable values. When enabled (default), the environment inherits project-level default values. If disabled, you must manually provide values for each variable to ensure pipelines function successfully across environments. |
Note
If you use a Matillion Full SaaS solution, the cloud credentials associated with your environment will be used to access the S3 bucket.
If you use a Hybrid SaaS solution, your new environment will inherit the Maia agent's execution role (service account role) to access the default S3 bucket specified here.
To overwrite this role, associate different cloud credentials with this environment after you have finished creating it. You can create these credentials before or after creating the environment.
Note
For Public Preview only. Where Post-processing is available on a component, all properties will be displayed in the Configuration tab, next to the Post-processing tab.
Example: Using system variables in post-processing🔗
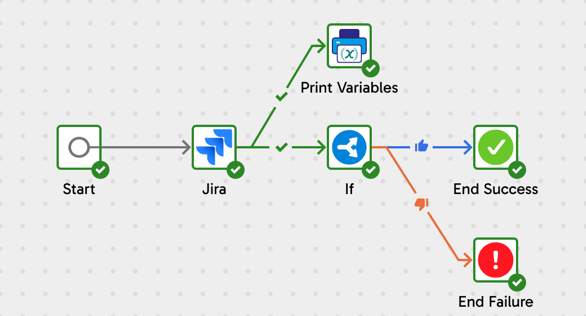
The following example uses a simple orchestration pipeline to demonstrate the effectiveness of using system variables and post-processing. In this pipeline, we will connect to Jira, extract and load a table of issues, and then use an If component to read a user-defined variable's value and set the pipeline's end state to success or failure. The user-defined variable will be mapped to a system variable using the post-processing capabilities in Designer.
This example uses the following components:
- Start: this is the starting point of any orchestration pipeline.
- Jira Query: this is the connector we'll use to extract and load data, and which we'll base our system variable's value on.
- If: this is how we'll conditionally define the success or failure of our pipeline based on the value of our system variable.
- Print Variables: this will be used to print the value of our variable to the task history.
- End Success: a successful end point for our pipeline.
- End Failure: an unsuccessful end point for our pipeline.
Create a user-defined variable🔗
- In Designer, click the Manage variables icon on the canvas.
- Click Add to begin creating a new variable.
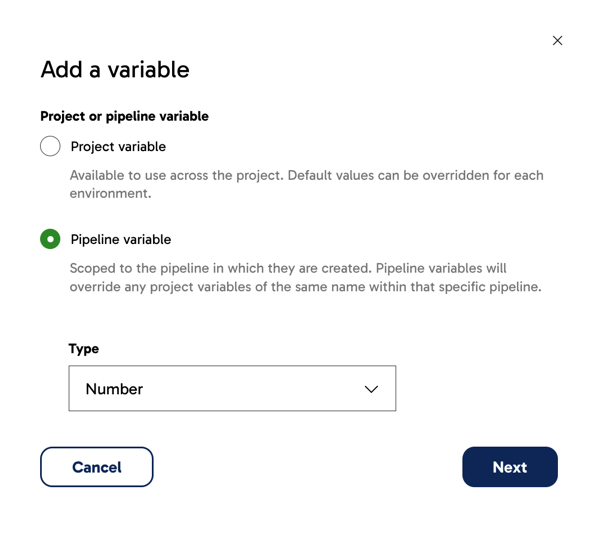
- In the Add a variable dialog, configure the basic settings of your variable.
- Select whether the variable is a project variable or a pipeline variable. Read Variable scope for more information.
- Set the variable type. Read Variable type for more information. For the purposes of this example, the scope is set to Pipeline variable and the type is set to Number.
-
Click Next.
-
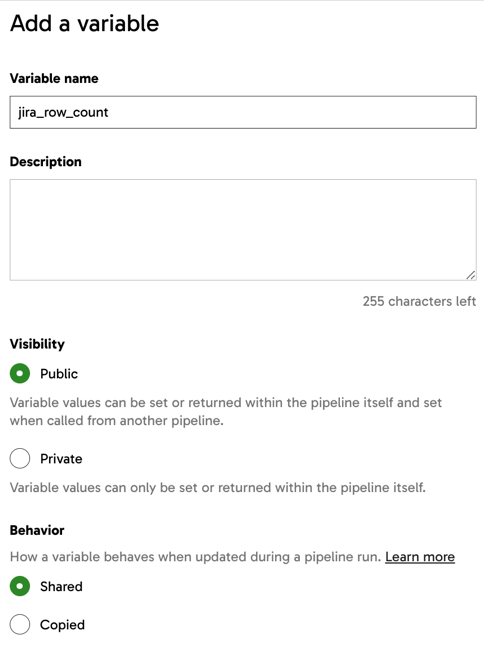
In the Add a variable panel, provide a name for your new variable. You can provide a description too, but this is optional. For this example, the Visibility and Behavior settings will be left as-is, and the default value is left blank.
- Click Create.
Set up system variables🔗
In this example, a Jira Query component is added to an orchestration pipeline to extract and load data from the Jira Issues data source.
The Post-processing tab is available in all orchestration pipeline components in the same location and works in the same manner, so using a different connector (such as Salesforce or Shopify) than Jira if you're following this example is fine.
To set up a system variable:
- Click on the orchestration component you wish to set up a system variable on. In this example, the Jira Query component is selected.
- Switch over to the Post-processing tab.
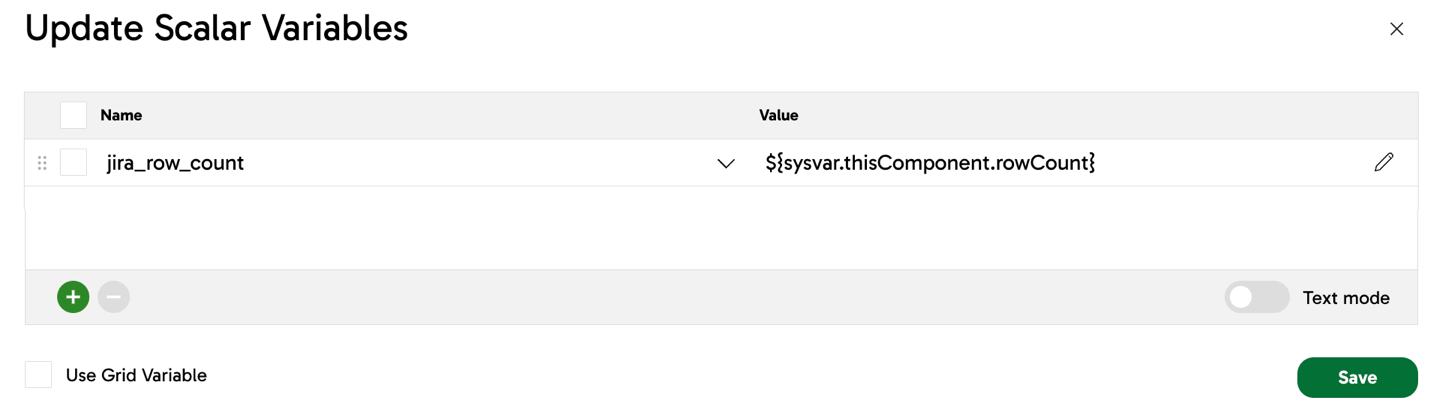
- Click into the Update Scalar Variables parameter.
- The Name column displays any existing pipeline and project variables. Select the variable you created earlier.
- The Value column is where you'll select a system variable to map your user-defined variable to.
- In the Value field, type
${sysvarto begin with, and all available system variables will be displayed. - In this example, we will use
${sysvar.thisComponent.rowCount}, a system variable that returns the row count of the component at runtime, and we're going to map this to our user-defined variable namedjira_row_count.
- In the Value field, type
- Click Save to finish setting up your system variables.
Set up Print Variables🔗
This section is optional. The Print Variables component will display the value of any specified variables at a given point in time in the Task history tab.
In this case:
- The Variables to print parameter is configured to print the value of the variable
jira_row_count. - The Prefix text parameter is left blank.
- The Include variable name parameter is set to
Yes.
Set up success and failure conditions🔗
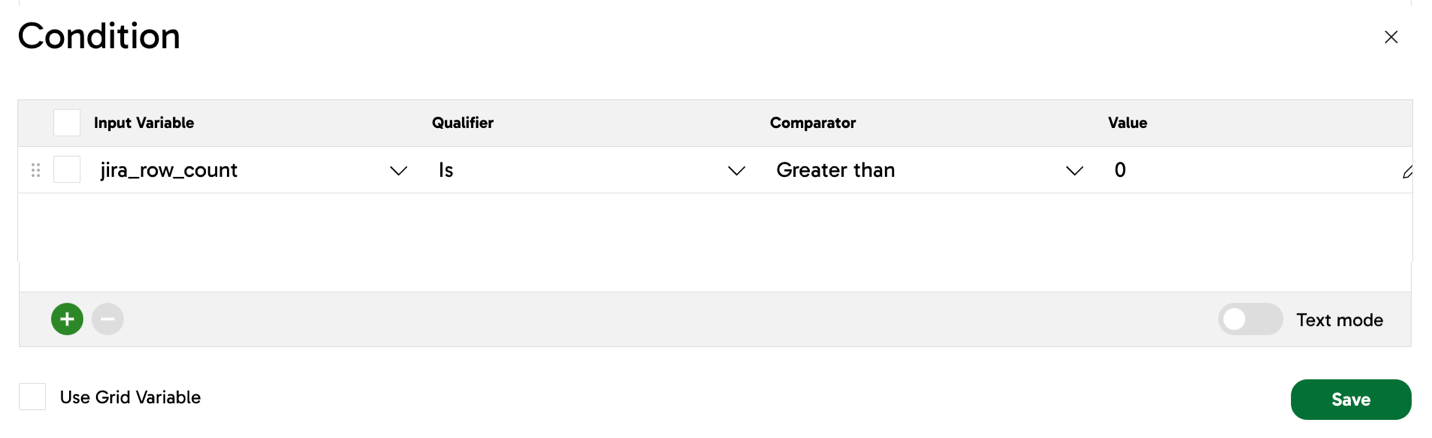
- In this part of the example, an If component is used to define conditional logic.
- In the If component's Condition parameter, a condition is defined. In this example, the value of our user-defined variable
jira_row_countmust be greater than0for the condition to pass as true. - When the condition is true, the If component will connect to an End Success component and finish the pipeline successfully. However, if the condition is false, the If component will connect to an End Failure component and the pipeline will fail.
Run the pipeline🔗
It's time to run our pipeline.
- Click Run.
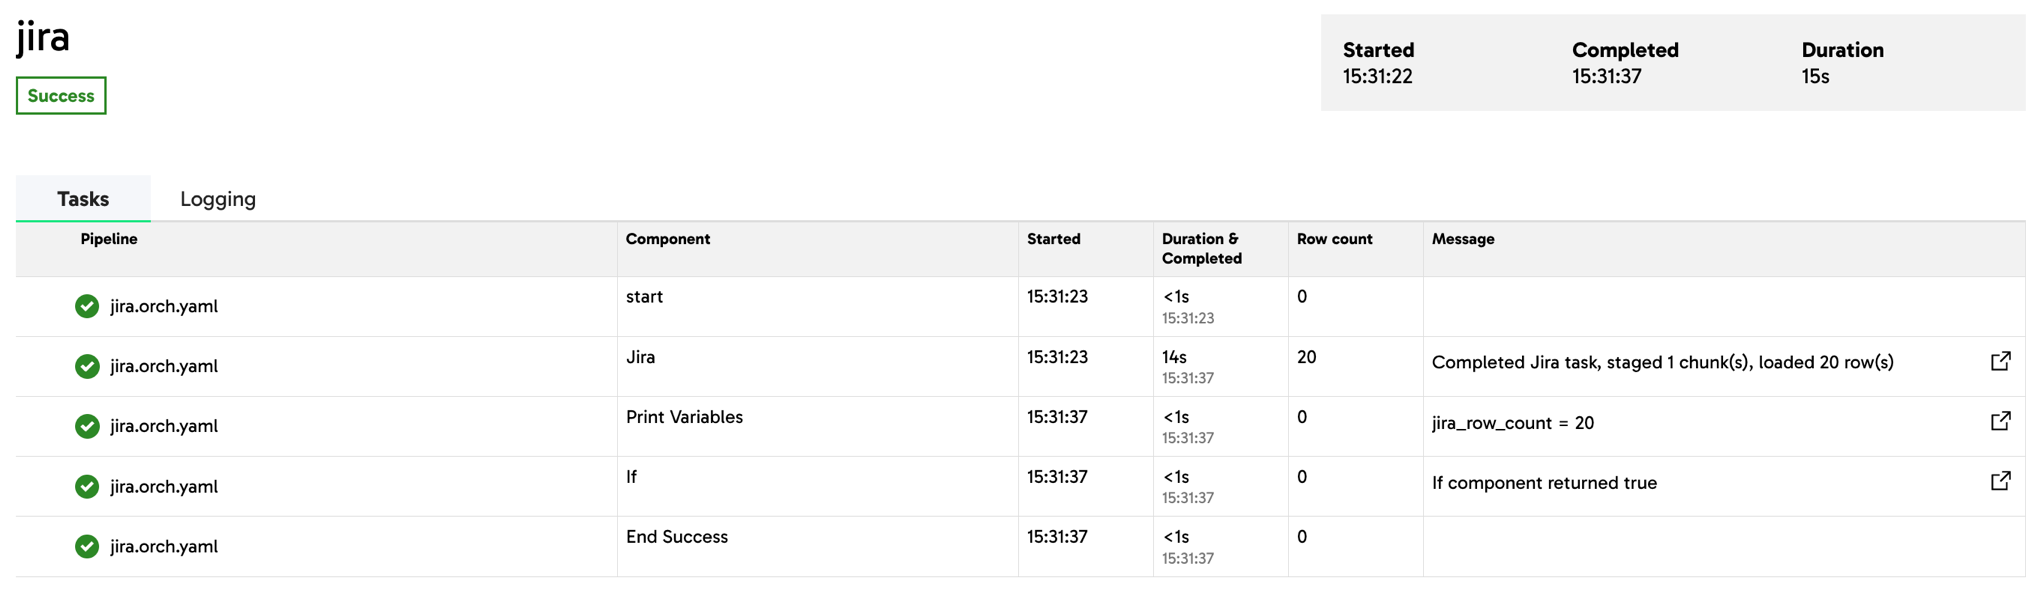
- In the Task history tab, double-click the running task to view the task execution status of your pipeline.
In this example, the Jira Query component loaded 20 rows of data, which meets the conditional logic of jira_row_count being greater than 0. Therefore, the If component moves forward to an End Success component, rather than the End Failure component.
The Print Variables component displays its message jira_row_count = 20, confirming the value of ${sysvar.thisComponent.rowCount}, which has been mapped to jira_row_count.
Why was this useful?🔗
A component can run successfully while loading 0 rows. For example, if the Jira Query connector remained set up correctly but was pulling data from an empty Jira project (i.e. no issues), then the connector could succeed with a row count of 0. By assigning our user-defined variable to a system variable that produces statistical and referential data and metrics about a component at runtime, we ensured that an If component could determine the success or failure of the pipeline based on the desired minimum row count value.
Our Pipelines tutorial is a step-by-step walkthrough that explains how to create an orchestration pipeline and a transformation pipeline using sample data provided by Matillion. This guide may be useful if you are new to Designer and want to practice creating pipelines and configuring components.
The Files panel displays indicators next to the name of a pipeline if it has uncommitted changes:
- N – The pipeline is new.
- M – The pipeline has been modified.
- R – The pipeline has been renamed but no other changes have been made.
Note
Deleted pipelines won't be displayed in the Files panel but will be listed in the Changes table in the Commit dialog.
These indicators help you quickly identify changes that you have made but not yet committed.
Warning
Once you connect a project to a Git repository (GitHub, GitLab, Azure DevOps, or Bitbucket), you cannot disconnect or change the Git repository connection.
You must create a new project from scratch if you need to:
- Disconnect from your current Git repository.
- Connect to a different Git repository.
- Switch between different repo host platforms (e.g., from GitHub to GitLab).
Reusing an existing Matillion ETL Git repository isn't supported and can cause issues with your pipelines.
Note
To change a variable's name, description, or default value, click the Manage variables icon in Designer, then click the pencil icon next to the specific variable you want to edit. See Variables for details.
Note
Salesforce IDs are shown in either a 15-character or 18-character format. The additional three characters form a checksum that allows the ID to function in case-insensitive systems. Both formats refer to the same record. Maia displays the 18-character version as returned by the Salesforce API.