Post-processing🔗
You can use post-processing in Designer to dynamically update scalar variables and define custom output messages after a component executes. All Designer components (except the Start component) include a Post-processing tab, where you can work with user-defined pipeline variables, project variables, and system variables.
Post-processing is especially useful for:
- Mapping user-defined variables to system-generated data (such as row count or execution time).
- Enhancing logging and reporting through custom output messages.
- Triggering downstream logic based on system variable values.
System variables in post-processing🔗
System variables provide runtime context about component execution, such as row counts, execution duration, or pipeline name. These variables are automatically populated after a component runs.
Some examples:
- Row count:
${sysvar.rowCount} - Execution duration:
${sysvar.execution.duration} - Pipeline name:
${sysvar.environment.name}
For a complete reference, read the System Variables documentation.
Note
- System variable names cannot be changed.
- System variables are read-only and updated automatically.
- Some system variables may not be available if their values are not yet resolved during execution (such as
${sysvar.thisComponent.status}).
Add a custom output message🔗
You can now define a custom output message in the Post-processing tab. This message will be appended to the component's standard output and is available via the ${sysvar.message} variable for use elsewhere in your pipeline, such as for logging, notifications, or auditing.
To add a custom output message:
- Select a component in your orchestration pipeline and open the Post-processing tab.
- In the Additional Output Message field, enter your message text.
-
You can include most system variables using
${}syntax. For example:Environment name is ${sysvar.environment.name} -
JavaScript expressions are supported within
${}as well.
Note
The output message is generated before scalar variable updates are processed. Some system variables, such as .thisComponent.status may not be available if they depend on post-execution states.
Update scalar variables in post-processing🔗
You can also update scalar variables (pipeline or project scope) using values from system variables or static inputs.
To update scalar variables:
- Select a component in your orchestration pipeline and then select the Post-processing tab.
- Click the Update Scalar Variables field to open the Update Scalar Variables dialog.
- In the Name column, select a variable you want to update.
- In the Value column, provide the new value. This can include a system variable (such as
${sysvar.rowCount}).
Note
Type ${sysvar} in the Value field to view auto-suggested available system variables.
Example: Using system variables in post-processing🔗
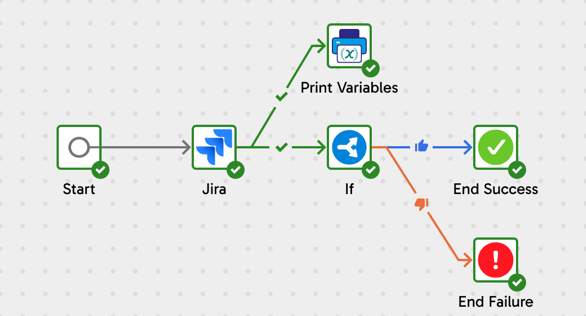
The following example uses a simple orchestration pipeline to demonstrate the effectiveness of using system variables and post-processing. In this pipeline, we will connect to Jira, extract and load a table of issues, and then use an If component to read a user-defined variable's value and set the pipeline's end state to success or failure. The user-defined variable will be mapped to a system variable using the post-processing capabilities in Designer.
This example uses the following components:
- Start: this is the starting point of any orchestration pipeline.
- Jira Query: this is the connector we'll use to extract and load data, and which we'll base our system variable's value on.
- If: this is how we'll conditionally define the success or failure of our pipeline based on the value of our system variable.
- Print Variables: this will be used to print the value of our variable to the task history.
- End Success: a successful end point for our pipeline.
- End Failure: an unsuccessful end point for our pipeline.
Create a user-defined variable🔗
- In Designer, click the Manage variables icon on the canvas.
- Click Add to begin creating a new variable.
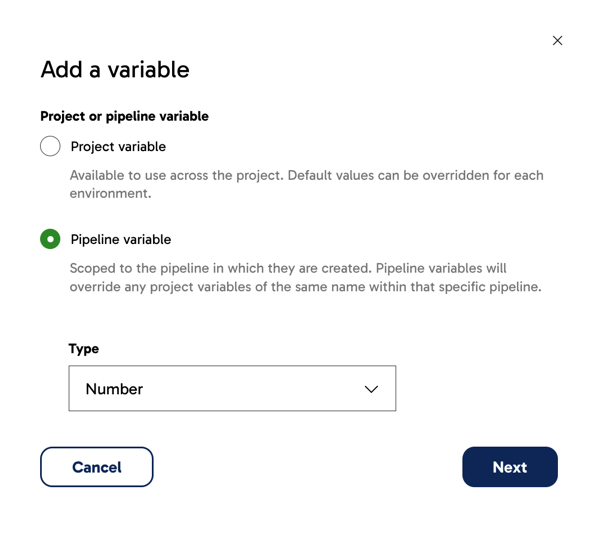
- In the Add a variable dialog, configure the basic settings of your variable.
- Select whether the variable is a project variable or a pipeline variable. Read Variable scope for more information.
- Set the variable type. Read Variable type for more information. For the purposes of this example, the scope is set to Pipeline variable and the type is set to Number.
-
Click Next.
-
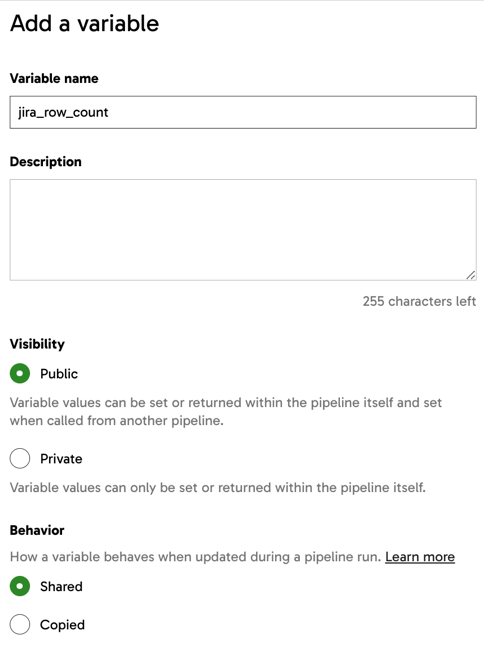
In the Add a variable panel, provide a name for your new variable. You can provide a description too, but this is optional. For this example, the Visibility and Behavior settings will be left as-is, and the default value is left blank.
- Click Create.
Set up system variables🔗
In this example, a Jira Query component is added to an orchestration pipeline to extract and load data from the Jira Issues data source.
The Post-processing tab is available in all orchestration pipeline components in the same location and works in the same manner, so using a different connector (such as Salesforce or Shopify) than Jira if you're following this example is fine.
To set up a system variable:
- Click on the orchestration component you wish to set up a system variable on. In this example, the Jira Query component is selected.
- Switch over to the Post-processing tab.
- Click into the Update Scalar Variables parameter.
- The Name column displays any existing pipeline and project variables. Select the variable you created earlier.
- The Value column is where you'll select a system variable to map your user-defined variable to.
- In the Value field, type
${sysvarto begin with, and all available system variables will be displayed. - In this example, we will use
${sysvar.thisComponent.rowCount}, a system variable that returns the row count of the component at runtime, and we're going to map this to our user-defined variable namedjira_row_count.
- In the Value field, type
- Click Save to finish setting up your system variables.
Set up Print Variables🔗
This section is optional. The Print Variables component will display the value of any specified variables at a given point in time in the Task history tab.
In this case:
- The Variables to print parameter is configured to print the value of the variable
jira_row_count. - The Prefix text parameter is left blank.
- The Include variable name parameter is set to
Yes.
Set up success and failure conditions🔗
- In this part of the example, an If component is used to define conditional logic.
- In the If component's Condition parameter, a condition is defined. In this example, the value of our user-defined variable
jira_row_countmust be greater than0for the condition to pass as true. - When the condition is true, the If component will connect to an End Success component and finish the pipeline successfully. However, if the condition is false, the If component will connect to an End Failure component and the pipeline will fail.
Run the pipeline🔗
It's time to run our pipeline.
- Click Run.
- In the Task history tab, double-click the running task to view the task execution status of your pipeline.
In this example, the Jira Query component loaded 20 rows of data, which meets the conditional logic of jira_row_count being greater than 0. Therefore, the If component moves forward to an End Success component, rather than the End Failure component.
The Print Variables component displays its message jira_row_count = 20, confirming the value of ${sysvar.thisComponent.rowCount}, which has been mapped to jira_row_count.
Why was this useful?🔗
A component can run successfully while loading 0 rows. For example, if the Jira Query connector remained set up correctly but was pulling data from an empty Jira project (i.e. no issues), then the connector could succeed with a row count of 0. By assigning our user-defined variable to a system variable that produces statistical and referential data and metrics about a component at runtime, we ensured that an If component could determine the success or failure of the pipeline based on the desired minimum row count value.


