Customize Maia with context files🔗
Context files are a powerful way to embed reusable knowledge and best practices directly into every Maia prompt. These Markdown files are stored in your project and can include project context, business rules that affect pipeline design, data warehousing standards, and naming conventions.
Maia automatically reads all context files stored in your project and uses them to enhance its responses so you don't have to repeat your requirements every time. Each time you interact with Maia, the content of all context files is included in the background, helping Maia understand your standards and preferences.
Context files and additional rules, such as naming conventions, are an extremely useful tool that will help you get the most out of Maia, your agentic data team. We strongly recommend creating a context file that contains information about your data, project, and organization as applicable.
Context files can help you to:
- Contextualize your project: Give Maia context about your work so it is better able to understand your needs.
- Enforce naming conventions: Define how pipelines and resources should be named, in order to ensure consistency.
- Build awareness: Provide Maia with business-specific definitions, glossary terms, or standards so it can understand your data.
- Simplify reuse: Store connection information, such as usernames, for systems that you will frequently use to build data pipelines.
When to use skills and context files🔗
Skills and context files should be used in different ways to help Maia understand your data and provide better responses to your prompts. The table below clarifies some of the differences between skills and context files.
| Skills | Context files |
|---|---|
| Provide guidelines or additional context that Maia may use to answer your prompts, if it considers them relevant. | Provide rules that Maia will always consider when answering your prompts. |
| Used to inform Maia's response if Maia interprets them as suitable for the task it is working on. | Always used to inform Maia's response, no matter what your prompt is. |
| Should be used to give Maia task-specific, context-dependent instructions. | Should be used for instructions that you want Maia to consider in every prompt. |
Context file best practices🔗
- Keep content focused and actionable
- Prioritize rules over explanations: Focus on what Maia should do, not background information.
- Use imperative language: Write instructions as directives (e.g., "Always prefix staging tables with
stg_") rather than descriptions. - Be concise: Maia reads all context files with every interaction. Verbose files slow down processing and may dilute important rules.
- Structure for clarity
- Use clear headers: Organize by topic (naming conventions, data standards, connection info) so Maia can quickly locate relevant rules.
- Use bullet points and tables: These formats are easier for Maia to parse than dense paragraphs.
- Provide examples: Include concrete examples alongside rules to reduce ambiguity.
- Maintain and update regularly
- Review periodically: Context files should evolve with your project. Outdated rules can lead to incorrect outputs.
- Remove obsolete content: Delete rules that no longer apply rather than letting them accumulate.
- Version with your project: Commit context file changes alongside related pipeline changes.
Formatting and storing context files🔗
Context files must be .md (Markdown) files and must be stored in a folder with the following path: .matillion/maia/rules/. This folder is created automatically if you add a context file in the Maia interface. If you create a context file from scratch, you need to create this folder structure first. The rules folder can be accessed in the Files panel in Designer.
It is important to note:
- Maia enforces a strict 12,000-character limit across all Markdown context files stored in the
.matillion/maia/rules/directory. Additional context files stored in different folders are ignored unless you tell Maia to reference them as described in Adding additional context files. These files do not count toward the character limit. - It's important to keep your context files updated. Maia won't automatically prompt you to make updates unless you ask it to, so make sure you regularly review and update them as your project evolves.
Note
You can add additional context files, such as naming-conventions.md, connections.md, standards.md, or context.md to your root folder, as described in Adding additional context files.
We do not recommend storing additional context files in the .matillion/... folder, as this folder is a reserved location in your project. Storing additional files in this folder may cause issues in the future.
Add or edit context files in the Maia interface🔗
You can work with context files directly in the Maia chat interface by clicking the corresponding option in the top right of the Maia chat interface:
- Add context: This button appears at the top of the chat panel when no context file exists. Clicking this option automatically creates the
.matillion/maia/rules/folder and a Markdown file calledcontext.md. - Edit context: After a context file has been created, this button allows you to open and edit the file without switching views. If you have more than one context file in the
.matillion/maia/rules/folder, this button will open the context file that was created first.
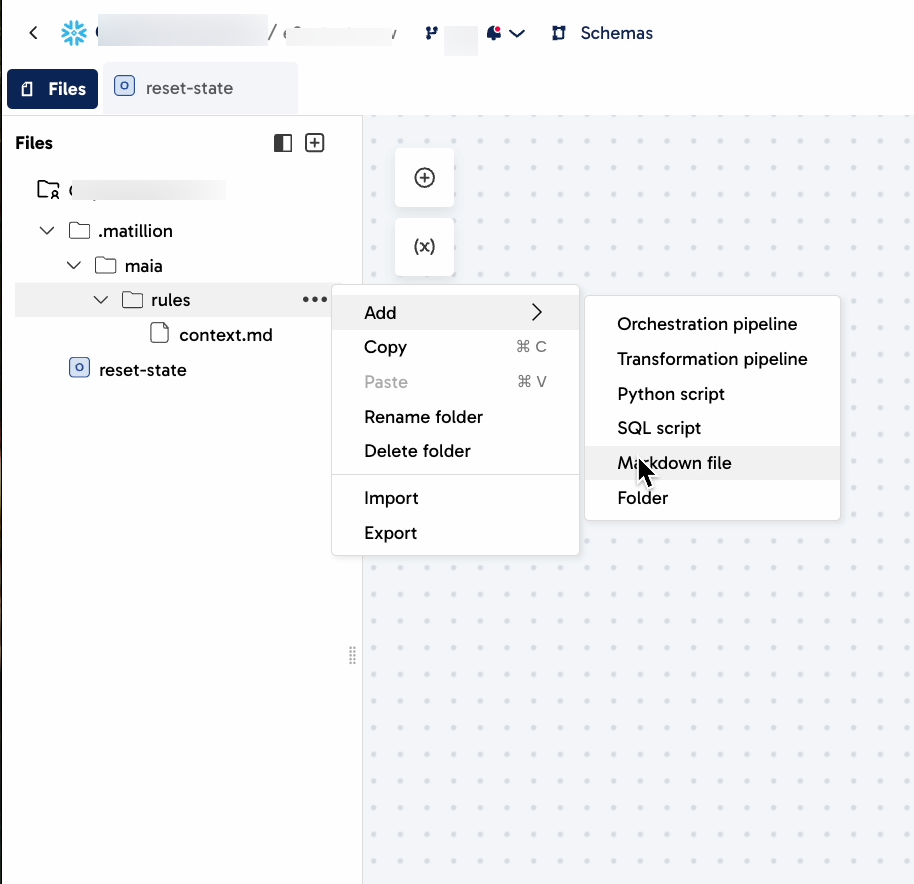
Add or edit context files in the Files panel🔗
To add a new context file if no context file exists, follow these steps. If you have already created at least one context file, skip steps 1 and 2.
- Create a top-level folder called
.matillion. - In the
.matillionfolder, create a folder calledmaia. - In the
maiafolder, create a folder calledrules. - Click the three dots ... next to the
rulesfolder, then Add, then Markdown file. - Write your context content in plain Markdown. Maia supports headings, lists, and tables.
Adding additional context files🔗
Maia can also access additional context, such as complex logic, detailed documentation, or full business process guides. Unlike your static context files, which Maia always reads, Maia will dynamically choose when to refer to your additional files. This allows Maia to use situational information and use-case-specific context to respond to your prompts. For example, if you tell Maia "When building a transformation pipeline, always refer to the comprehensive standards in additional-context/transformation_standards.md", Maia will always refer to this additional context file when building transformation pipelines, but not orchestration pipelines.
To allow Maia to access additional context files:
- Store this content in a directory other than the
.matillion/...directory. Any other directory in your project is suitable. For example, you could create a new folder calledadditional-contextat the root level and add a new Markdown file callednaming-conventions. - Click Edit context in the Maia chat interface to edit your context file.
- In your context file, reference the location of your additional context. For example, you could tell Maia "Follow all the rules listed in the
naming-conventionsfile stored in theadditional-contextfolder."
This ensures that the context file containing essential information remains within the character limit, while still allowing Maia users and teammates to access more detailed information.
Sample context files🔗
Sample context files are available to help teams standardize project documentation, enforce naming conventions, and define best practices. These examples are intended to accelerate setup and ensure consistency across pipeline development. Example context files are available to download below, or from the Matillion Exchange.
These files can be used to:
- Apply consistent naming and modeling standards across teams.
- Embed reusable business logic and glossary terms into Maia's prompts.
- Simplify setup by reusing validated patterns and integration rules.
To use a context file from the Matillion Exchange:
- Download a context file using the links below or the Matillion Exchange.
- Replace any placeholder logic, metadata, and KPIs with your own standards.
- Save the file in the
.matillion/maia/rules/directory of your project. - Commit your changes.
- Once you have committed your changes, Maia will use the context file during future interactions.
| Context file | Purpose |
|---|---|
| Data analyst | Enable Maia to support data analysts with natural language querying, anomaly detection, and automated operational reporting. You can tailor this file by updating job names, table structures, report types, and metrics to meet your needs. |
| Data quality engineer | Streamline and scale your data quality practices by embedding validation rules, monitoring standards, and remediation logic directly into AI-powered workflows. |
| Data scientist | Support automated feature engineering and model development using predictive analytics workflows with AI. |
| Retail analytics | Enable Maia to generate pipelines aligned with retail sales analysis, product insights, and category trends. |
| Tutorial | Enable Maia to deliver tutorials, explain how to configure components, and guide users through data integration workflows. |
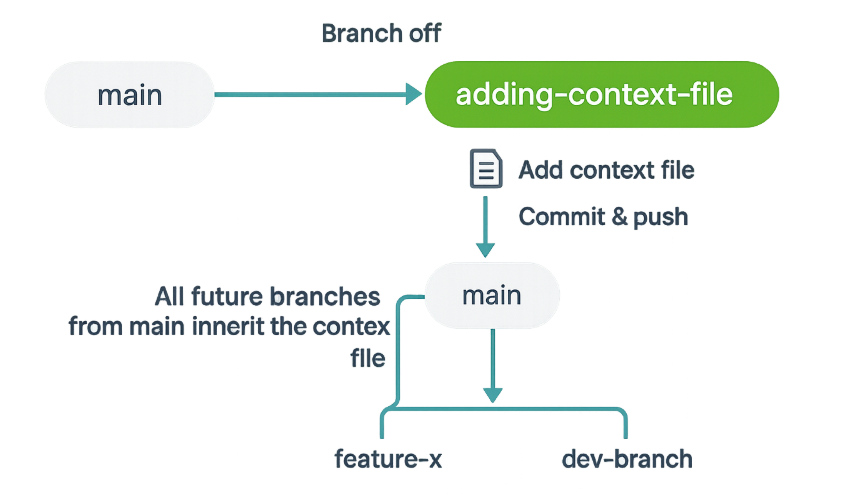
Merging context files to your main branch🔗
To make sure your context file is available in all future branches, we recommend using this Git workflow:
- Start from your default branch (for example,
main). - Create a feature branch from
main(e.g.,adding-context-file). - Add the context file, then commit and push your changes.
- Switch back to
main, merge in the feature branch, and push the updatedmainbranch. - All future branches created from
mainwill automatically include the context file.