Data Cleanse🔗
Public preview Minimum Maia agent version: 11.147.0
The Data Cleanse transformation component lets you profile your data, identify data quality issues, and apply rules to improve data quality and cleanse your dataset. Profiling your data lets you examine your data in detail to understand and identify potential data quality issues, before using rules to clean the data and ensure that further transformations are applied effectively. Maia, your agentic data team, will also provide suggestions based on your data to help you spot potential improvements.
Note
For datasets larger than 1,000,000 records, you'll see a message stating "Your dataset is larger than 1,000,000 records. For optimal performance, a statistical analysis has been performed to profile the data." This means a representative sample of your data is used to calculate profiling metrics, ensuring fast performance without compromising accuracy. The sampling techniques used are designed to produce statistically reliable results, so your data profile remains trustworthy.
Use case🔗
The Data Cleanse component is useful if you need to standardize, correct or transform data according to business rules. The key advantage of this component is its rule-based approach, which lets you define and apply multiple independent transformations in a single component, thereby keeping your pipeline simpler and easier to maintain.
The Data Cleanse component can be used to:
- Improve data quality and standardization: Convert names to proper case, trim whitespace, and apply consistent formatting.
- Handle missing or invalid data: Remove or replace null and empty values, and flag records that don't meet your validation criteria.
- Apply conditional rules: Cleanse data that matches specific criteria, and apply different rules to the same column depending on your chosen conditions.
- Migrate and integrate data: Harmonize data from different sources, and prepare your data for downstream systems.
Using the Data Cleanse component🔗
There are multiple ways to add the Data Cleanse component to your pipeline, and open the Data Cleanse configuration view.
You can:
- Click the Add component icon on the canvas, then add the Data Cleanse component.
- Click the output connection from the component whose data you want to clean up, then add the Data Cleanse component.
- Sample the data in an existing component, then click Cleanse data in the top right of the Sample data panel.
If you use either of the first two methods, click the Data Cleanse component and then click the Rules property to open the configuration view. If you click Cleanse data in the Sample data panel when sampling the data in a component, the configuration view will open automatically.
In the Data Cleanse configuration view, you can explore your data in detail, then filter your data, and then apply rules to the data displayed in the table. Click the Sort icon next to any column name to sort the table by the values in this column.
Click a column to visualize the data in this column in the bottom right of the Data Cleanse configuration view. Here, you can see the most common values in this column, as well as how many rows are populated with a value compared to the columns containing empty or null values.
Filtering data🔗
Use the Filter field above the data table to filter the data displayed in the table. Either type in an SQL filter expression, or write your filter in plain text and Maia will convert it into a valid filter expression.
After creating filters, use the Filters toggle above the data table to switch the filters on and off, as shown in the video below.
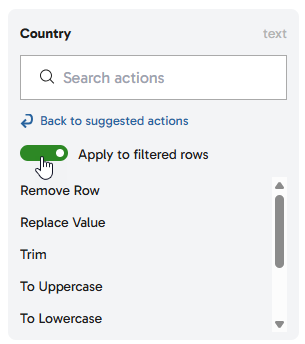
If you click a column to create a rule when you have at least one filter applied to your data, you can switch on the Apply to filtered rows toggle to only apply the new rule to the filtered rows of data. To apply your rule to all data, switch off the toggle. The image below shows the location of the Apply to filtered rows toggle.
If you have a filter applied to your data and then choose to remove a row or flag, the column you have selected does not matter. The filter is applied separately to the column selection. After a rule has been applied, any filters applied to your data will remain in place. This might mean that you don't see any data in your table if you apply a rule to remove rows and the applied filter results in the remaining rows being hidden.
Creating rules🔗
You can create a rule by clicking one of Maia's suggestions, which will automatically apply the rule to your data, or by following these steps:
- Apply any required filters to the data in the table. For information about how to filter the data shown in the table, see Filtering data.
- Click the column you want to apply the rule to.
- In the panel on the right, which displays the name of the selected column at the top, click the Search actions field.
- In the drop-down, select the action you want to take or condition you want to apply to the data in this column. For details about the available actions, see the Actions table below.
- If the action or condition requires an input, enter the required information in the text field and click Apply.
After creating a rule, click the Recipe button in the top right of the Data Cleanse configuration view to see all the rules applied to the data in the selected column. The number displayed in the Recipe button shows how many rules you have currently applied. Rules are applied in the order that they are listed in the Recipe panel.
Rule effects🔗
The table below explains the rules you can apply to your data using the Data Cleanse component. The rule is applied to all rows in the selected column that match your filter criteria.
| Rule | Effect | Use case |
|---|---|---|
| Remove Row | Removes rows | Filter out invalid or unwanted data |
| Replace Value | Replaces values with a new value | Fix known data issues or standardize codes |
| Trim | Removes leading and trailing whitespace around values | Correct data entry errors |
| To Uppercase | Converts values to UPPERCASE | Standardize codes and identifiers |
| To Lowercase | Converts values to lowercase | Standardize emails and usernames |
| To Title Case | Capitalizes the first letter of each word, e.g. "Title Case" | Standardize names and addresses |
| Remove Special Characters | Removes any non-alphanumeric characters | Clean data like IDs and phone numbers |
| Flag | Adds a boolean flag column containing true in the visible rows, and false in all other rows |
Mark problematic rows for review |
Reordering and deleting rules🔗
Click the Recipe button in the top right of the Data Cleanse configuration view to open the Recipe panel. Here, you can drag and drop rules to change the order in which they are applied, and delete rules by clicking the three dots next to each rule.
Note
It is currently not possible to edit rules. To change a rule, you need to delete the existing rule and create a new one. You can then drag and drop the new rule into its correct position in the Recipe panel so that it is applied in the same position as the previous rule.
Example use cases🔗
The use cases below provide some examples of how to combine rules in the Data Cleanse component to get the best results and improve the quality of your data.
Standardizing inconsistent agent ID formats🔗
Problem: Agent IDs are formatted differently across data sources, and need to be standardized in your output data. The format you want to use for all agent IDs is an alphanumeric code like AGT001, but the data you have collected includes extra whitespaces, incorrect case formatting, and special characters.
Solution: Select the Agent ID column in your data table, and apply the Trim, To Uppercase, and Remove Special Characters rules.
Result: The agent IDs are standardized in the format you require.
| Original ID data | Result after applying rules |
|---|---|
AGT101 |
AGT101 |
agt102 |
AGT102 |
AGT-103 |
AGT103 |
Replacing invalid values🔗
Problem: An old data source contains outdated status codes for customer subscriptions, and you want to bring these up to date with your new standards. The old codes are single letters, which need to be replaced with a corresponding word.
Solution: Filter the data to only show rows containing one of the old status codes, for example "Status" = 'A'. Next, apply the Replace Value rule to these columns, and enter the new word in the Replace value with field, e.g. Active. Repeat these steps for each of the codes.
Result: The old codes are replaced with the corresponding words.
| Original status data | Result after applying rules |
|---|---|
A |
Active |
C |
Cancelled |
I |
Inactive |